Pages

Tuesday, December 27, 2011

Gingerbread Houses on ciLiving


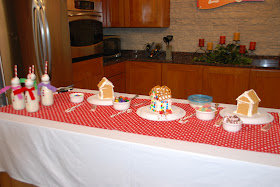
For one of our Holiday Week shows, my kids got to come and help me decorate some gingerbread houses that we constructed out of milk cartons.  They were super easy, and just their size for decorating!  Brock & Jillian totally morphed into little celebrities once we went live.  And to think I thought they were going to be quiet and shy... not a chance.  I'm hoping to have a link to the segment up soon so you can see them in action.


My gingerbread house decorating skills are less than ideal...
 I LOVE this recipe for royal icing on allrecipes.com
Works like glue.  You can find it HERE!
I actually use 4 1/2 C. powdered sugar and vanilla instead of lemon, but it's completely up to you!


And aren't these the CUTEST???
Just recycled some Starbucks jars, hot glued on some buttons, tied felt scarves around the neck, popped a donut hole on top with two brown sprinkle eyes, a tic tac nose and a mouth drawn on with a food writer pen.  So easy!  Gotta love pinterest for pointing me in the right direction!  I found the idea HERE
Stay tuned for the link to the segment!

Sunday, December 18, 2011

Brock's Power Ranger 5th Birthday

 
I can't believe I'm the mother of a 5 year old...
Where have the last 5 years gone???
As I'm sure you can tell, this 5 year old LOVES Power Rangers.  He has pretty much been obsessed with Power Rangers ever since going to a flea market with TJ's mom and finding some Power Ranger action figures.  
And can I just say that it is seriously difficult finding Power Ranger party ideas out there that aren't from way back in the day... 
So, I used one of the pictures from our church fall fest as the party invitation and used picnik.com to jazz it up.  Then on the back I added...

Go, Go Samurai!
It’s time to morph on over
To Jupiter’s at the Crossing
to help defeat the nasty
Nighlok’s before they eat
all our pizza and steal
everyone’s tokens at
Brock’s 5th Birthday Party!
December 17, 2011
2511  Village Green Pl.,
 Champaign, IL
11:00 am – 1:00 pm
Please RSVP regrets to
the Head Power Ranger,
Queenieh@aol.com
 
So as you may notice, we had his party someplace other than my home.  You would think having a party at a fun location would mean less work for mom, but ohhhhhh no.  Not this mom.  I still had to go all out with the balloons and party favors and cupcakes. 
 

I just stuck with vanilla cupcakes and plain buttercream frosting, then I topped them with a black gumball.  I found these really neat plates at Hobby Lobby, meant mainly for decorations, not for food purposes, but I thought they were cute and at 50% off, couldn't really pass them up.  Then I took a jar and threw some red sparkly confetti shreds (is that what you call those things?) in and topped it with the plate and cupcakes.


I thought they turned out cute...
 

Then I took some red pails and used my cricut and some black vinyl to add each kid's name to them and threw in some candy to represent each of the Power Rangers.  Then I tossed in a little sheet of paper to explain each piece of candy that said...

Power Ranger Goody Bag
Red Ranger, Jayden’s, cherry bubble gum
Blue Ranger, Kevin’s, blue rock candy
Green Ranger, Mike’s, watermelon pop rocks
Gold Ranger, Antonio’s, gold rolos
Pink Ranger, Mia’s, strawberry sour straws
Yellow Ranger, Emily’s, banana now and laters
Go, Go Power Rangers!


I attached red with white polka dots balloons and black balloons from Hobby Lobby to each pail.  I was so excited to find polka dotted balloons at Hobby Lobby since I had won a helium tank from a giveaway I won, so doing the balloons myself was a deal!  
 

I LOVE this picture of Brock opening up his presents with all his little helpers.  They all just look so genuinely happy.  Isn't that why we go to all this work putting parties together for our kids, to get faces that look like those???  Love.It.


Time to blow out the candles...
 

Next up... time to use those tokens on some fun games and collect some tickets!
 

How AMAZING are these cookies?
It's so nice making friends with other party gals in blog-land, I'm lucky enough to be friends with Nikki from The Sweetest Thing.  This summer we did a little bartering of our services, I made her son a birthday banner in exchange for cookies at a later date.  Hello later date... They were gorgeous and delicious!  I guess I didn't get a picture of the yellow ranger cookie, but she does such amazing work!  You should totally check out her work and LIKE her on facebook HERE.   


Then as if pails filled with candy and balloons weren't enough for a party favor, I found this idea for some fun swords on pinterest HERE.  They were pretty easy to put together... well, I guess I shouldn't say that... let's try that again... They were pretty easy for MY HUBBY to put together!  (Gotta love having a crafty hubby!)  The kids LOVED them!  


So, all in all I think Brock had a GREAT time at his party!  It was actually pretty easy throwing together.  But I still can't believe he's 5... say it ain't so.

Sunday, December 11, 2011

Eggnog Cupcakes and Ugly Christmas Sweater Invites

{photo via Annie's Eats}

Friday's show was quite interesting...
Not only did I make these (well, not those exact cupcakes up there, but some that look remarkably close to those since I managed to forget my camera at home) yummy cupcakes for my cupcake segment on ciLiving, I also somehow agreed to start the show with no make-up and no hair done in order to get a holiday make-over from one of our guests.  Not sure I'd agree to do that again... no make up was a scary look with those lights shining down on me!  YiKeS!
But, I found this recipe on pinterest and thought they sounded pretty holiday'ish and yummy.  I'm not an eggnog fan, but my dad and brother look forward to eggnog being in the stores every season and can guzzle that stuff down (the non-alcoholic stuff) so I made these with them in mind.  They turned out great, the batter is pretty thin and runny, but don't let that scare you... they were good, and the frosting is just as de-lish!  We don't drink at our house, but I did use the rum called for in the recipe in these cupcakes and thought they turned out great.  Thanks to Annie's Eats for the amazing recipe, which I'll share at the end of this post.
Now, where would the perfect place be to serve eggnog and eggnog cupcakes?  Why, at an Ugly Christmas Sweater party... where else?  So, here I am on the show with a big ol' hair-do and a face full of holiday party make-up... and I bust out my ugly Christmas sweater!  Very funny.  Just had to pre-face that in case you choose to watch the clip of my segment on the show which you can view HERE.
I found the PERFECT ugly sweater invites on pinterest from j&paper.  Jessica has such cute invites and she graciously made me one for the show...
 

You should totally go and like her on facebook HERE 
and check out her etsy site HERE.  Super cute stuff!
Thank you so much, Jessica! 

So, anyone hosting any fun parties coming up? 


Eggnog Cupcakes:
Recipe via Annie's Eats

Yield: about 18-20 cupcakes
For the cupcakes:
1 1/3 cups all-purpose flour
¼ tsp. baking soda
½ tsp. baking powder
½ tsp. salt
¼ tsp. freshly ground nutmeg
¼ cup dark rum or bourbon (optional)
1 cup eggnog
¼ cup vegetable or canola oil
1 tbsp. apple cider vinegar
1 tsp. vanilla extract
1 cup sugar

For the frosting:
20 tbsp. unsalted butter, at room temperature
2½ cups confectioners' sugar, sifted
Pinch of salt
Pinch of freshly grated nutmeg
2½ tbsp. eggnog
1 tbsp. dark rum (0ptional)

For garnish:
Ground cinnamon or grated nutmeg
Cinnamon sticks

Directions:
To make the cupcakes, preheat the oven to 350˚ F.  Line cupcake pans with paper liners.  In a medium bowl, combine the flour, baking soda, baking powder, salt and nutmeg; whisk to combine.  In the bowl of an electric mixer, combine the rum, eggnog, vegetable oil, vinegar, and sugar.  Beat on medium-low speed until well blended.  Add in the dry ingredients and mix on low speed just until incorporated.  
Divide the batter between the prepared cupcake liners, filling the cups 2/3 full.  Bake 22-24 minutes (mine only needed to bake for 16-17 minutes), or until a toothpick inserted in the center comes out clean.  Allow to cool in the pan 5 minutes, then transfer to a wire rack to cool completely.
To make the frosting, place the butter in the bowl of an electric mixer fitted with the whisk attachment.  Beat on medium-high speed until smooth, 20-30 seconds.  Add in the powdered sugar, salt and nutmeg, and mix on medium-high speed until incorporated and smooth, about 1 minute.  Scrape down the sides of the bowl.  Add in the eggnog and  whip on medium-high speed until light and fluffy, 4 minutes.  With the mixer on medium-low speed, blend in the rum.  
Fill a pastry bag with the frosting and decorate the cooled cupcakes as desired.  Sprinkle with ground cinnamon or grated nutmeg, and garnish with cinnamon sticks if desired. 

Saturday, December 3, 2011

Nutella Hot Chocolate, Cupcakes, & Hot Chocolate Stirrers


What do you know???  
I finally remembered to take some pictures of one of my cooking segments at ciLiving!
Fridays in December I'll be featuring holiday goodies, so for my first segment I went with some Nutella Hot Chocolate and then made some cupcakes that look like sweet little mugs of hot chocolate and some hot chocolate stirrers.  Again, found these ideas off pinterest and again, didn't make the nutella hot chocolate until live on tv!  I knew you really couldn't go wrong though with anything containing nutella, so I felt pretty confident!  :)
 
 The cupcakes were super easy, especially since I ran out of time and had to buy store made cupcakes (gasp!) but I say when you are in a pinch and are just flat out of time (can someone please send me extra hours in the day as a Christmas present?  I'd love you forever!) there's nothing wrong with buying pre-made cupcakes, even if you are known as The Cupcake Lady.  But I jazzed these chocolate cupcakes up with a small candy cane for the mug's handle and topped them with mini marshmallows and chocolate chips.  Easy Peasy.


Then I found the idea for these marshmallow stirrers on Icing Designs blog.  Unfortunately I couldn't find those peppermint sticks, so I just used a candy cane, broke off the hook, and stuck them in marshmallows, dipped them in almond bark and rolled them in coarse sanding sugar.  Could not have been easier!  Other great ideas for hot chocolate stirrers could be candy canes, cinnamon sticks, or even dipping a plastic spoon in the almond bark!  So many different options out there, just get creative!

Then I made the Nutella Hot Chocolate... 
which has probably been the easiest thing I've whipped up thus far on the show.  


I found the idea on Real Mom Kitchen's blog and she has lots of other hot chocolate variations you should check out, but I thought this one sounded easy and yummy!  And it was!  Here's the recipe:

Nutella Hot Chocolate
  • 4 cups whole milk
  • 1/2 cup Nutella
  • mini marshmallows or whipped cream
In a medium sauce pan over medium-low heat, whisk together milk and Nutella until the Nutella is melted and milk gets nice and warm. Serve in mugs and top with marshmallows or whipped cream. Makes 4 servings.
This can be made ahead of time, cooled, and stored in the fridge.  Reheated on the stove or microwave in individual mugs.  If microwaving, reheat each cup for about 1 minute.

To see the clip of me and Drew making these treats, you can check it out HERE!

Coming up next week....
I'm thinking EGGNOG CUPCAKES...
What do you think???
Do you have any ideas of what else I could feature this month or something you'd like to see?


No Bake Turtle Pumpkin Pie

Recently in honor of November being Diabetes Awareness Month and it being so close to Thanksgiving, I made some No Bake Turtle Pumpkin Pie for a cooking segment on ciLiving
I found the recipe on pinterest (where else?) on a blog called Sing For Your Supper.  (I love that name!)
But it looked easy enough, and who doesn't love anything when caramel is involved?


Again... another recipe I had never tried making until live on tv, but it turned out GREAT and you would never know it was diabetic friendly!  To see me make it on the show, check it out HERE!

Here's the recipe:

No-Bake Turtle Pumpkin Pie


1/4 cup plus 2 tablespoons sugar free caramel ice cream topping, divided
1 graham cracker pie crust
1/2 cup plus 2 tablespoons pecan pieces, divided
1 cup cold 1% milk
2 packages (4-serving size) vanilla sugar-free, fat-free instant pudding
1 cup canned pumpkin
1 teaspoon ground cinnamon
1/4 teaspoon ground nutmeg
1/4 teaspoon ground cloves
1 tub (8 ounce) light whipped topping, thawed, divided

Pour 1/4 cup caramel topping into crust; sprinkle with 1/2 cup pecans.
Beat milk, pudding mixes, pumpkin, and spices with whisk until blended. Gently fold in 1 1/2 cup whipped topping. Spread into crust.
Refrigerate at least 1 hour. Top with remaining whipped topping and 2 tablespoons pecans. Drizzle with remaining 2 tablespoons caramel topping.

Nutritional analysis: (per one slice)
Calories – 165
Fiber – 2.7
Protein – 2
Total fat – 7
Carbohydrate – 23


W-O-W!

Oh my goodness...
My blog has had such a nice vacation, but it recently told me that it was ready to work again.
It's ready to share what all I've been up to at ciLiving, time to share the yummy treats I've been whipping up with central Illinois and share them with the rest of blog land.  (Especially since all the treats I've whipped up have been found online... in particular pinterest!  Let me know if you need an invite!)
So, I guess I should start back with Halloween...
At the last minute I was asked to whip up some Halloween treats, and two different segments at that!  So, I went to my girl, Elizabeth's, blog because I knew she would have something yummy to make and that it would be easy!  Sure enough she didn't fail me.  I found her recipe for Pumpkin Fluff on pinterest and decided to go with it.  Super easy, super fast, super delicious...


Then I also shared how to make these yummy Oreo Mummy Pops that I had actually made the very first time I ever appeared on the 7:00 news show.  Can't get much easier than oreos and almond bark!


To see the entire clip of me making these treats you can watch it HERE

Then during this same show I also whipped up some Pumpkin Cream Cheese Frosting.
(Again.... something I'd never tried before until show time!)
And note to self.... don't make frosting on live tv.  Takes wayyyyyy tooooo long!
Before the show I made my yummy Martha Stewart Pumpkin Cupcakes

which I usually top with pumpkin buttercream, but I wanted to try something new and so I found a recipe for Pumpkin Cream Cheese Frosting.  SUPER DE-LISH!
Here's the recipe:

8oz cream cheese (softened)
1/4 C. pumpkin
1/4 C. butter (I use unsalted)
1/2 tsp. vanilla
4 C. powdered sugar

Mix it all up and it's super yummy!

Want to see me mix it up??  Click HERE!

Wish I had a picture of them to share... but I usually forget my camera at home or when I do actually remember to take it to the station I never have time to whip it out and take photos!  So, watch the clip and you can see just how I did it!